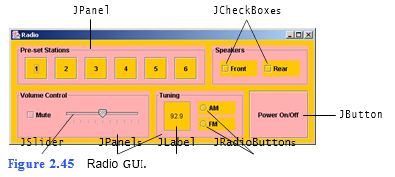
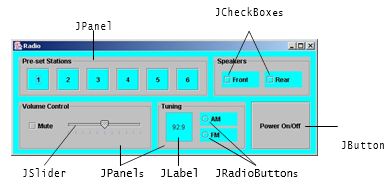
(Radio GUI) An important part of GUI design is color selection. The Radio GUI shown in Fig. 2.45 uses colors that some people find unattractive. Using the predefined Color values, modify the colors in this GUI to make it more attractive. For instance, the Radio GUI shown in Fig. 2.46 replaces all orange with cyan and replaces all pink with light gray. You should try several possibilities.


a) Copying the template to your working directory. Copy the C:Examples Tutorial02ExercisesRadio directory to your C:SimplyJava directory.
b) Opening the template file. Open the Radio.java file in your text editor.
c) Customizing colors. In the template code, locate every occurrence of Color.ORANGE and replace it with Color.CYAN. Then, locate every occurrence of Color.PINK and replace it with Color.LIGHT_GRAY.
d) Saving the application. Save your modified source code file.
e) Opening the Command Prompt window and changing directories. Open the Command Prompt by selecting Start > Programs > Accessories > Command Prompt. Change to your working directory by typing cd C:SimplyJavaRadio, then pressing Enter.
f) Compiling the completed application. In the Command Prompt window, compile your application by typi
```
1 // Exercise 2.16: Radio.java
2 // Creates the radio GUI.
3 import java.awt.*;
4 import java.awt.event.*;
5 import javax.swing.*;
6 import javax.swing.border.*;
7
8 public class Radio extends JFrame
9 {
10 private JButton oneJButton, twoJButton, threeJButton,
11 fourJButton, fiveJButton, sixJButton, powerJButton;
12 private JPanel tuningJPanel, speakersJPanel, presetJPanel,
13 volumeControlJPanel;
14 private JRadioButton amJRadioButton, fmJRadioButton;
15 private JTextField stationJTextField;
16 private JCheckBox muteJCheckBox, frontJCheckBox, rearJCheckBox;
17 private JSlider volumeJSlider;
18
19 // no-argument constructor
20 public Radio()
21 {
22 createUserInterface();
23 }
24
25 // create and position GUI components
26 private void createUserInterface()
27 {
28 // get contentPane and set layout to null
29 Container contentPane = getContentPane();
30 contentPane.setBackground( Color.CYAN );
31 contentPane.setLayout( null );
32
33 // set up presetJPanel
34 presetJPanel = new JPanel();
35 presetJPanel.setLayout( null );
36 presetJPanel.setBorder( new TitledBorder(
37 "Pre-set Stations" ) );
38 presetJPanel.setBounds( 10, 10, 355, 75 );
39 presetJPanel.setBackground( Color.LIGHT_GRAY );
40 contentPane.add( presetJPanel );
41
42 // set up oneJButton
43 oneJButton = new JButton();
44 oneJButton.setBounds( 16, 22, 42, 42 );
45 oneJButton.setText( "1" );
46 oneJButton.setBackground( Color.CYAN );
47 presetJPanel.add( oneJButton );
48
49 // set up twoJButton
50 twoJButton = new JButton();
51 twoJButton.setBounds( 72, 22, 42, 42 );
52 twoJButton.setText( "2" );
53 twoJButton.setBackground( Color.CYAN );
54 presetJPanel.add( twoJButton );
55
56 // set up threeJButton
57 threeJButton = new JButton();
58 threeJButton.setBounds( 128, 22, 42, 42 );
59 threeJButton.setText( "3" );
60 threeJButton.setBackground( Color.CYAN );
61 presetJPanel.add( threeJButton );
62
63 // set up fourJButton
64 fourJButton = new JButton();
65 fourJButton.setBounds( 184, 22, 42, 42 );
66 fourJButton.setText( "4" );
67 fourJButton.setBackground( Color.CYAN );
68 presetJPanel.add( fourJButton );
69
70 // set up fiveJButton
71 fiveJButton = new JButton();
72 fiveJButton.setBounds( 240, 22, 42, 42 );
73 fiveJButton.setText( "5" );
74 fiveJButton.setBackground( Color.CYAN );
75 presetJPanel.add( fiveJButton );
76
77 // set up sixJButton
78 sixJButton = new JButton();
79 sixJButton.setBounds( 296, 22, 42, 42 );
80 sixJButton.setText( "6" );
81 sixJButton.setBackground( Color.CYAN );
82 presetJPanel.add( sixJButton );
83
84 // set up volumeControlJPanel
85 volumeControlJPanel = new JPanel();
86 volumeControlJPanel.setLayout( null );
87 volumeControlJPanel.setBorder( new TitledBorder(
88 "Volume Control" ) );
89 volumeControlJPanel.setBounds( 10, 95, 250, 90 );
90 volumeControlJPanel.setBackground( Color.LIGHT_GRAY );
91 contentPane.add( volumeControlJPanel );
92
93 // set up muteJCheckBox
94 muteJCheckBox = new JCheckBox();
95 muteJCheckBox.setBounds( 16, 24, 60, 42 );
96 muteJCheckBox.setText( "Mute" );
97 muteJCheckBox.setBackground( Color.LIGHT_GRAY );
98 volumeControlJPanel.add( muteJCheckBox );
99
100 // set up volumeJSlider
101 volumeJSlider = new JSlider();
102 volumeJSlider.setBounds( 86, 24, 150, 50 );
103 volumeJSlider.setPaintTicks( true );
104 volumeJSlider.setMajorTickSpacing( 10 );
105 volumeJSlider.setBackground( Color.LIGHT_GRAY );
106 volumeControlJPanel.add( volumeJSlider );
107
108 // set up speakersJPanel
109 speakersJPanel = new JPanel();
110 speakersJPanel.setLayout( null );
111 speakersJPanel.setBorder( new TitledBorder( "Speakers" ) );
112 speakersJPanel.setBounds( 375, 10, 182, 75 );
113 speakersJPanel.setBackground( Color.LIGHT_GRAY );
114 contentPane.add( speakersJPanel );
115
116 // set up frontJCheckBox
117 frontJCheckBox = new JCheckBox();
118 frontJCheckBox.setBounds( 16, 28, 70, 30 );
119 frontJCheckBox.setText( "Front" );
120 frontJCheckBox.setBackground( Color.CYAN );
121 speakersJPanel.add( frontJCheckBox );
122
123 // set up rearJCheckBox
124 rearJCheckBox = new JCheckBox();
125 rearJCheckBox.setBounds( 96, 28, 70, 30 );
126 rearJCheckBox.setText( "Rear" );
127 rearJCheckBox.setBackground( Color.CYAN );
128 speakersJPanel.add( rearJCheckBox );
129
130 // set up tuningJPanel
131 tuningJPanel = new JPanel();
132 tuningJPanel.setLayout( null );
133 tuningJPanel.setBorder( new TitledBorder( "Tuning" ) );
134 tuningJPanel.setBounds( 270, 95, 166, 90 );
135 tuningJPanel.setBackground( Color.LIGHT_GRAY );
136 contentPane.add( tuningJPanel );
137
138 // set up stationJTextField
139 stationJTextField = new JTextField();
140 stationJTextField.setBounds( 16, 20, 50, 55 );
141 stationJTextField.setText( "92.9" );
142 stationJTextField.setEditable( false );
143 stationJTextField.setHorizontalAlignment( JLabel.CENTER );
144 stationJTextField.setBackground( Color.CYAN );
145 tuningJPanel.add( stationJTextField );
146
147 // set up amJRadioButton
148 amJRadioButton = new JRadioButton();
149 amJRadioButton.setBounds( 80, 20, 70, 25 );
150 amJRadioButton.setText( "AM" );
151 amJRadioButton.setBackground( Color.CYAN );
152 tuningJPanel.add( amJRadioButton );
153
154 // set up fmJRadioButton
155 fmJRadioButton = new JRadioButton();
156 fmJRadioButton.setBounds( 80, 50, 70, 25 );
157 fmJRadioButton.setText( "FM" );
158 fmJRadioButton.setBackground( Color.CYAN );
159 tuningJPanel.add( fmJRadioButton );
160
161 // set up powerJButton
162 powerJButton = new JButton();
163 powerJButton.setBounds( 446, 95, 111, 90 );
164 powerJButton.setText( "Power On/Off" );
165 powerJButton.setBackground( Color.LIGHT_GRAY );
166 contentPane.add( powerJButton );
167
168 // set properties of application’s window
169 setTitle( "Radio" ); // set title bar text
170 setSize( 575, 220 ); // set window size
171 setVisible( true ); // display window
172
173 } // end method createUserInterface
174
175 // main method
176 public static void main( String args[] )
177 {
178 Radio application = new Radio();
179 application.setDefaultCloseOperation( JFrame.EXIT_ON_CLOSE );
180
181 } // end method main
182
183 } // end class Radio
```
You might also like to view...
Describe RAM and virtual memory, and explain why these are forms of temporary storage
What will be an ideal response?
The term ________ refers to the underlying computer system on which application programs can run
Fill in the blank(s) with correct word