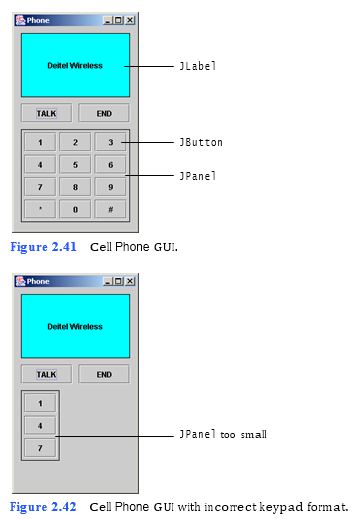
(Cell Phone GUI) In this exercise, you will adjust the size of the cell phone’s numeric keypad and the position of the keypad buttons so that they appear as shown in Fig. 2.41.
a) Copying the template to your working directory. Copy the C:Examples Tutorial02ExercisesPhone directory to your C:SimplyJava directory.
b) Opening the Command Prompt window and changing directories. Open the Com- mand Prompt by selecting Start > Programs > Accessories > Command Prompt. Change to your working directory by typing cd C:SimplyJavaPhone, then pressing Enter.
c) Compiling the template application. Compile your application by typing the com- mand javac Phone.java, then pressing Enter.
d) Running the template application. Run the application by typing java Phone. The
GUI of the Phone template application should appear as shown in Fig. 2.42.

e) Closing the application. Close the running application by clicking its close button.
This returns you to the Command Prompt window.
f) Opening the template file. Open the Phone.java file in your text editor.
g) Customizing the keypad JPanel. The keypad JPanel is too small for all the keypad buttons. Y
```
1 //
2 // Creates the cell phone GUI.
3 import java.awt.*;
4 import java.awt.event.*;
5 import javax.swing.*;
6 import javax.swing.border.*;
7
8 public class Phone extends JFrame
9 {
10 private JLabel displayLabel;
11 private JPanel numberJPanel;
12 private JButton oneJButton, twoJButton, threeJButton,
13 fourJButton, fiveJButton, sixJButton, sevenJButton,
14 eightJButton, nineJButton, starJButton, zeroJButton,
15 poundJButton, talkJButton, endJButton;
16
17 // no-argument constructor
18 public Phone()
19 {
20 createUserInterface();
21 }
22
23 // create and position GUI components
24 private void createUserInterface()
25 {
26 // get content pane and set its layout
27 Container contentPane = getContentPane();
28 contentPane.setLayout( null );
29
30 // set up displayLabel
31 displayLabel = new JLabel();
32 displayLabel.setText( "Deitel Wireless" );
33 displayLabel.setBounds( 10, 10, 170, 100 );
34 displayLabel.setBorder( new LineBorder( Color.BLACK ) );
35 displayLabel.setHorizontalAlignment( JLabel.CENTER );
36 displayLabel.setBackground( Color.CYAN );
37 displayLabel.setOpaque( true );
38 contentPane.add( displayLabel );
39
40 // set up talkJButton
41 talkJButton = new JButton();
42 talkJButton.setText( "TALK" );
43 talkJButton.setBounds( 10, 120, 80, 30 );
44 contentPane.add( talkJButton );
45
46 // set up endJButton
47 endJButton = new JButton();
48 endJButton.setText( "END" );
49 endJButton.setBounds( 100, 120, 80, 30 );
50 contentPane.add( endJButton );
51
52 // set up numberJPanel
53 numberJPanel = new JPanel();
54 numberJPanel.setBounds( 10, 160, 170, 145 );
55 numberJPanel.setBorder( new LineBorder( Color.BLACK ) );
56 numberJPanel.setLayout( null );
57 contentPane.add( numberJPanel );
58
59 // set up oneJButton
60 oneJButton = new JButton();
61 oneJButton.setText( "1" );
62 oneJButton.setBounds( 5, 5, 50, 30 );
63 numberJPanel.add( oneJButton );
64
65 // set up twoJButton
66 twoJButton = new JButton();
67 twoJButton.setText( "2" );
68 twoJButton.setBounds( 60, 5, 50, 30 );
69 numberJPanel.add( twoJButton );
70
71 // set up threeJButton
72 threeJButton = new JButton();
73 threeJButton.setText( "3" );
74 threeJButton.setBounds( 115, 5, 50, 30 );
75 numberJPanel.add( threeJButton );
76
77 // set up fourJButton
78 fourJButton = new JButton();
79 fourJButton.setText( "4" );
80 fourJButton.setBounds( 5, 40, 50, 30 );
81 numberJPanel.add( fourJButton );
82
83 // set up fiveJButton
84 fiveJButton = new JButton();
85 fiveJButton.setText( "5" );
86 fiveJButton.setBounds( 60, 40, 50, 30 );
87 numberJPanel.add( fiveJButton );
88
89 // set up sixJButton
90 sixJButton = new JButton();
91 sixJButton.setText( "6" );
92 sixJButton.setBounds( 115, 40, 50, 30 );
93 numberJPanel.add( sixJButton );
94
95 // set up sevenJButton
96 sevenJButton = new JButton();
97 sevenJButton.setText( "7" );
98 sevenJButton.setBounds( 5, 75, 50, 30 );
99 numberJPanel.add( sevenJButton );
100
101 // set up eightJButton
102 eightJButton = new JButton();
103 eightJButton.setText( "8" );
104 eightJButton.setBounds( 60, 75, 50, 30 );
105 numberJPanel.add( eightJButton );
106
107 // set up nineJButton
108 nineJButton = new JButton();
109 nineJButton.setText( "9" );
110 nineJButton.setBounds( 115, 75, 50, 30 );
111 numberJPanel.add( nineJButton );
112
113 // set up starJButton
114 starJButton = new JButton();
115 starJButton.setText( "*" );
116 starJButton.setBounds( 5, 110, 50, 30 );
117 numberJPanel.add( starJButton );
118
119 // set up zeroJButton
120 zeroJButton = new JButton();
121 zeroJButton.setText( "0" );
122
zeroJButton.setBounds( 60, 110, 50, 30 );
123 numberJPanel.add( zeroJButton );
124
125 // set up poundJButton
126 poundJButton = new JButton();
127 poundJButton.setText( "#" );
128 poundJButton.setBounds( 115, 110, 50, 30 );
129 numberJPanel.add( poundJButton );
130
131 // set properties of application’s window
132 setTitle( "Phone" ); // set title bar text
133 setSize( 198, 345 ); // set window size
134 setVisible( true ); // display window
135
136 } // end method createUserInterface
137
138 // main method
139 public static void main( String args[] )
140 {
141 Phone application = new Phone();
142 application.setDefaultCloseOperation( JFrame.EXIT_ON_CLOSE );
143
144 } // end method main
145
146 } // end class Phone
```
You might also like to view...
Filtering arrows are removed from column headings when you use the ________ to Range command
Fill in the blank(s) with correct word
Each time you drop a view onto the GridLayout in the Component Tree window, the view is placed in the layout’s next open cell, unless you specify otherwise by .
a. setting the view’s layout:row property b. setting the view’s layout:column property c. setting both the view’s layout:row and layout:column properties d. None of the above.